How to Deploy Tanzu Kubernetes Grid Cluster on VMware vSphere Infrastructure in 9 Steps


Audio : Listen to This Blog.
TKG is a CNCF-certified Kubernetes distribution. This blog post helps you to create Tanzu Kubernetes Grid Cluster running on vSphere 6.7 Update 3 infrastructure.
Pre-requisites:
- vSphere 6.7 Update 3 infrastructure (Minimum supported version).
- Resource pool in vSphere to deploy the Tanzu Kubernetes Grid Instance (TKG).
- VM folder in vSphere to collect the Tanzu Kubernetes Grid VMs (TKG).
- Linux VM to manage kubectl and to install Tanzu Kubernetes Grid CLI.
- A network segment with DHCP enabled.
- Download TKG OVA (kube, haproxy) & TKG CLI from – https://my.vmware.com/web/vmware/downloads/details?downloadGroup=TKG-112&productId=988
Software specifications used:
- vSphere 6.7 – Version 6.7.0.40000 Build 14368061
- ESXi host – version 6.7
- Linux VM – used CentOS 7.4 VM with DHCP enabled on the network (with 8GB RAM)
- HA proxy OVA – v.1.2.4
- Photon appliance kube OVA – v1.18.3
- Installed TKG CLI on Linux VM- tkg-linux-amd64-v1.1.2-vmware.1.gz
- VMFS6 datastore – SAN FC volume created from FlashArray
STEP 1: Installing Kubectl, Docker On Linux VM
[root@localhost ~]# curl -LO https://storage.googleapis.com/kubernetes-release/release/`curl -s https://storage.googleapis.com/kubernetes-release/release/stable.txt`/bin/linux/amd64/kubectl

% Total    % Received % Xferd  Average Speed   Time    Time     Time  Current
                             Dload  Upload   Total   Spent    Left  Speed
100 41.9M  100 41.9M    0     0  63.7M      0 --:--:-- --:--:-- --:--:-- 63.7M
[root@localhost ~]# chmod +x kubectl
[root@localhost ~]# mv kubectl /usr/local/bin
[root@localhost ~]# yum install docker
[root@localhost ~]# systemctl start docker
[root@localhost ~]# systemctl enable docker
Created symlink from /etc/systemd/system/multi-user.target.wants/docker.service to /usr/lib/systemd/system/docker.service.
STEP 2: Install TKG CLI on Linux VM
[root@localhost ~]# gunzip tkg-linux-amd64-v1.1.2-vmware.1.gz
[root@localhost ~]# mv tkg-linux-amd64-v1.1.2-vmware.1 /usr/local/bin/tkg
[root@localhost ~]# chmod +x /usr/local/bin/tkg
[root@localhost ~]# tkg version
Client:
Version: v1.1.2
Git commit: c1db5bed7bc95e2ba32cf683c50525cdff0f2396
STEP 3: Create an SSH Key Pair ON LINUX VM
[root@localhost ~]# ssh-keygen -t rsa -b 4096 -C "[email protected]"
Generating public/private rsa key pair.
Enter file in which to save the key (/root/.ssh/id_rsa):
Created directory '/root/.ssh'.
Enter passphrase (empty for no passphrase):
Enter same passphrase again:
Your identification has been saved in /root/.ssh/id_rsa.
Your public key has been saved in /root/.ssh/id_rsa.pub.
The key fingerprint is:

SHA256:OEUW0NgtXubzbeuSnATjExnVhSdBr56Dd3VH3mOGzhw [email protected]
The key's randomart image is:
+---[RSA 4096]----+
|      .=+o ..oo+.|
|      .o+ =   +..|
|       ..= o   oo|
|       o. B   .+.|
|      o S. * E.+*|
|       .  o *o*.=|
|           +.B=..|
|            =..o |
|             o.  |
+----[SHA256]-----+


[root@localhost ~]# cat /root/.ssh/id_rsa.pub
ssh-rsa AAAAB3NzaC1yc2EAAAADAQABAAACAQDveWLrtmqU+3ueNVrKcxZjEKuME3kmOa60iVGofTIE6X6kEzarSWEU1vVN2FWhO1D1sT0YooU/TiX2wODvkcKKdBBBQOP/
45lrvosVbOUM7LpprOOjfxwckXTbxPPune8toHX7MfjOTRAagyNUwX9Wztf2AhfzImD8tQudixNc+jCUrfICSxyfbqwBX2YbNQnAaQypkL+yuKjHoEjK+8juCU6SU/e42aWP
uI7U9U8LkGAxOaMQ93LshRokjFfFoShZjLgxxNrwvmBmoL5IegqOLsd8I7ZigKCkyGJk2PYvNfB6G/82udE6GdqLedwcilTVO6PkZXLXIVTBuk/cNruhYBcdgt+gfAyLWf4n
U+QKO9m6Enp6JvJVGyg6YBRs8N+i5QQrWprhxYzF/QnMOePdRbD4rpZsvH8KQg12/rrtLgLPzDcr2c7Efs+d8Vaa3jg0ZhHmaXSqaOcbylcxxSR+CGHfccpRs1kPlmtBkr2c
FYaAFLY5jgF2UXy9lSiwGr1waY/CFxI10lHqL7Wv5nFm9DiujHyuLSnQ5Kk1q5+M7EsFgI/I+lk3edI/1+c1LfJSspk6dgO4LKtw2sd+MrgDFLaxFpnWFXnaou/faAc3xCUb
Aj8zcYtUAgFdKQZEQ92uACApR4oTInk9OK0KvuDrMuuQLX9HCGunH7rkS3ADhQ== [email protected]


[root@localhost ~]# ssh-agent /bin/sh
sh-4.2# ssh-add ~/.ssh/id_rsa
Enter passphrase for /root/.ssh/id_rsa:
Identity added: /root/.ssh/id_rsa (/root/.ssh/id_rsa)

sh-4.2# exit
STEP 4: Deploy OVAs & Create Templates in vSphere 6.7 U3
Convert both ova (haproxy, kube) to templates and put them into a VM folder.
Here are the high-level steps:
- 1. In the vSphere Client, right-click on cluster & select Deploy OVF template.
- 2. Choose Local file, click the button to upload files, and navigate to the photon-3-kube-v1.18.3-vmware.1.ova file on your local machine.
- 3. Choose the appliance name
- 4. Choose the destination as VM folder – TKG1 (VM folder created as a part of pre-requisites)
- 5. Choose the destination as resource pool – TKG1 (Resource pool created as a part of pre-requisites)
- 6. Accept EULA
- 7. Select the datastore as (VMFS6 Datastore created as a part of software specifications)
- 8. Select the network for the VM to connect (Network segment created as a part of software specifications
- 9. Click Finish to deploy the VM
- 10. Right-click on the VM, select Template and click on Convert to Template
- 11. Follow the same step for haproxy OVA – photon-3-haproxy-v1.2.4-vmware.1.ova
Screenshot below:
Here’s an example of my vSphere, where I have created VM folder as TKG, and TKG1 – where both have kube and haproxy templates added to it.

STEP 5: Deploy Tanzu Kubernetes Grid Management cluster
First generate the config.yaml file on Linux VM:
[root@localhost ~]# tkg get management-cluster
 MANAGEMENT-CLUSTER-NAME  CONTEXT-NAME
[root@localhost ~]# cd .tkg/
[root@localhost .tkg]# ls -a
.  ..  bom  config.yaml  providers
Now edit the config.yaml file in that folder:
Example of my full YAML file:

cert-manager-timeout: 30m0s
overridesFolder: /root/.tkg/overrides
NODE_STARTUP_TIMEOUT: 20m
BASTION_HOST_ENABLED: "true"
providers:
  - name: cluster-api
    url: /root/.tkg/providers/cluster-api/v0.3.6/core-components.yaml

 type: CoreProvider
- name: aws
url: /root/.tkg/providers/infrastructure-aws/v0.5.4/infrastructure-components.yaml
type: InfrastructureProvider
- name: vsphere
url: /root/.tkg/providers/infrastructure-vsphere/v0.6.5/infrastructure-components.yaml
type: InfrastructureProvider
- name: tkg-service-vsphere
url: /root/.tkg/providers/infrastructure-tkg-service-vsphere/v1.0.0/unused.yaml
type: InfrastructureProvider
- name: kubeadm
url: /root/.tkg/providers/bootstrap-kubeadm/v0.3.6/bootstrap-components.yaml
type: BootstrapProvider
- name: kubeadm
url: /root/.tkg/providers/control-plane-kubeadm/v0.3.6/control-plane-components.yaml
type: ControlPlaneProvider
images:
    all:
        repository: registry.tkg.vmware.run/cluster-api
    cert-manager:
        repository: registry.tkg.vmware.run/cert-manager
        tag: v0.11.0_vmware.1
VSPHERE_SERVER: munavarvcsa.init82d-22.dev.purestorage.com
VSPHERE_USERNAME: [email protected]
VSPHERE_PASSWORD: "P@ssw0rd"
VSPHERE_DATACENTER: munavar
VSPHERE_DATASTORE: wsame_large
VSPHERE_NETWORK: SST-C14-sst01-VLAN2176
VSPHERE_RESOURCE_POOL: TKG1
VSPHERE_FOLDER: TKG1
VSPHERE_TEMPLATE: photon-3-kube-v1.18.3-vmware.1
VSPHERE_HAPROXY_TEMPLATE: photon-3-haproxy-v1.2.4-vmware.1
VSPHERE_DISK_GIB: "30"
VSPHERE_NUM_CPUS: "2"
VSPHERE_MEM_MIB: "4096"
VSPHERE_SSH_AUTHORIZED_KEY: "ssh-rsa AAAAB3NzaC1yc2EAAAADAQABAAACAQDveWLrtmqU+3ueNVrKcxZjEKuME3kmOa60iVGofTIE6X6kEzarSWEU1vVN2FWhO1D1sT0YooU/TiX2wODvkcKKdBBBQOP/45lrvosVbOUM7LpprOOjfxwckXTbxPPune8toHX7MfjOTRAagyNUwX9Wztf2AhfzImD8tQudixNc+jCUrfICSxyfbqwBX2YbNQnAaQypkL+yuKjHoEjK+8juCU6SU/e42aWPuI7U9U8LkGAxOaMQ93LshRokjFfFoShZjLgxxNrwvmBmoL5IegqOLsd8I7ZigKCkyGJk2PYvNfB6G/82udE6GdqLedwcilTVO6PkZXLXIVTBuk/cNruhYBcdgt+gfAyLWf4nU+QKO9m6Enp6JvJVGyg6YBRs8N+i5QQrWprhxYzF/QnMOePdRbD4rpZsvH8KQg12/rrtLgLPzDcr2c7Efs+d8Vaa3jg0ZhHmaXSqaOcbylcxxSR+CGHfccpRs1kPlmtBkr2cFYaAFLY5jgF2UXy9lSiwGr1waY/CFxI10lHqL7Wv5nFm9DiujHyuLSnQ5Kk1q5+M7EsFgI/I+lk3edI/1+c1LfJSspk6dgO4LKtw2sd+MrgDFLaxFpnWFXnaou/faAc3xCUbAj8zcYtUAgFdKQZEQ92uACApR4oTInk9OK0KvuDrMuuQLX9HCGunH7rkS3ADhQ== [email protected]"
SERVICE_CIDR: 100.64.0.0/13
CLUSTER_CIDR: 100.96.0.0/11
release:
    version: v1.1.2
Now, kick off deploy!
[root@localhost .tkg]# tkg init --infrastructure=vsphere --name=munavar-tkg-esx --plan=prod --config ./config.yaml
Logs of the command execution can also be found at: /tmp/tkg-20200728T123415379585498.log

Validating the pre-requisites...

Setting up management cluster...
Validating configuration...
Using infrastructure provider vsphere:v0.6.5
Generating cluster configuration...
Setting up bootstrapper...
Bootstrapper created. Kubeconfig: /root/.kube-tkg/tmp/config_9kc6cpAY
Installing providers on bootstrapper...
Fetching providers
Installing cert-manager
Waiting for cert-manager to be available...
Installing Provider="cluster-api" Version="v0.3.6" TargetNamespace="capi-system"
Installing Provider="bootstrap-kubeadm" Version="v0.3.6" TargetNamespace="capi-kubeadm-bootstrap-system"
Installing Provider="control-plane-kubeadm" Version="v0.3.6" TargetNamespace="capi-kubeadm-control-plane-system"
Installing Provider="infrastructure-vsphere" Version="v0.6.5" TargetNamespace="capv-system"
Start creating management cluster...
Saving management cluster kuebconfig into /root/.kube/config
Installing providers on management cluster...
Fetching providers
Installing cert-manager
Waiting for cert-manager to be available...
Installing Provider="cluster-api" Version="v0.3.6" TargetNamespace="capi-system"
Installing Provider="bootstrap-kubeadm" Version="v0.3.6" TargetNamespace="capi-kubeadm-bootstrap-system"
Installing Provider="control-plane-kubeadm" Version="v0.3.6" TargetNamespace="capi-kubeadm-control-plane-system"
Installing Provider="infrastructure-vsphere" Version="v0.6.5" TargetNamespace="capv-system"
Waiting for the management cluster to get ready for move...
Moving all Cluster API objects from bootstrap cluster to management cluster...
Performing move...
Discovering Cluster API objects
Moving Cluster API objects Clusters=1
Creating objects in the target cluster
Deleting objects from the source cluster
Context set for management cluster munavar-tkg-esx as 'munavar-tkg-esx-admin@munavar-tkg-esx'.

Management cluster created!

You can now create your first workload cluster by running the following:

  tkg create cluster [name] --kubernetes-version=[version] --plan=[plan]
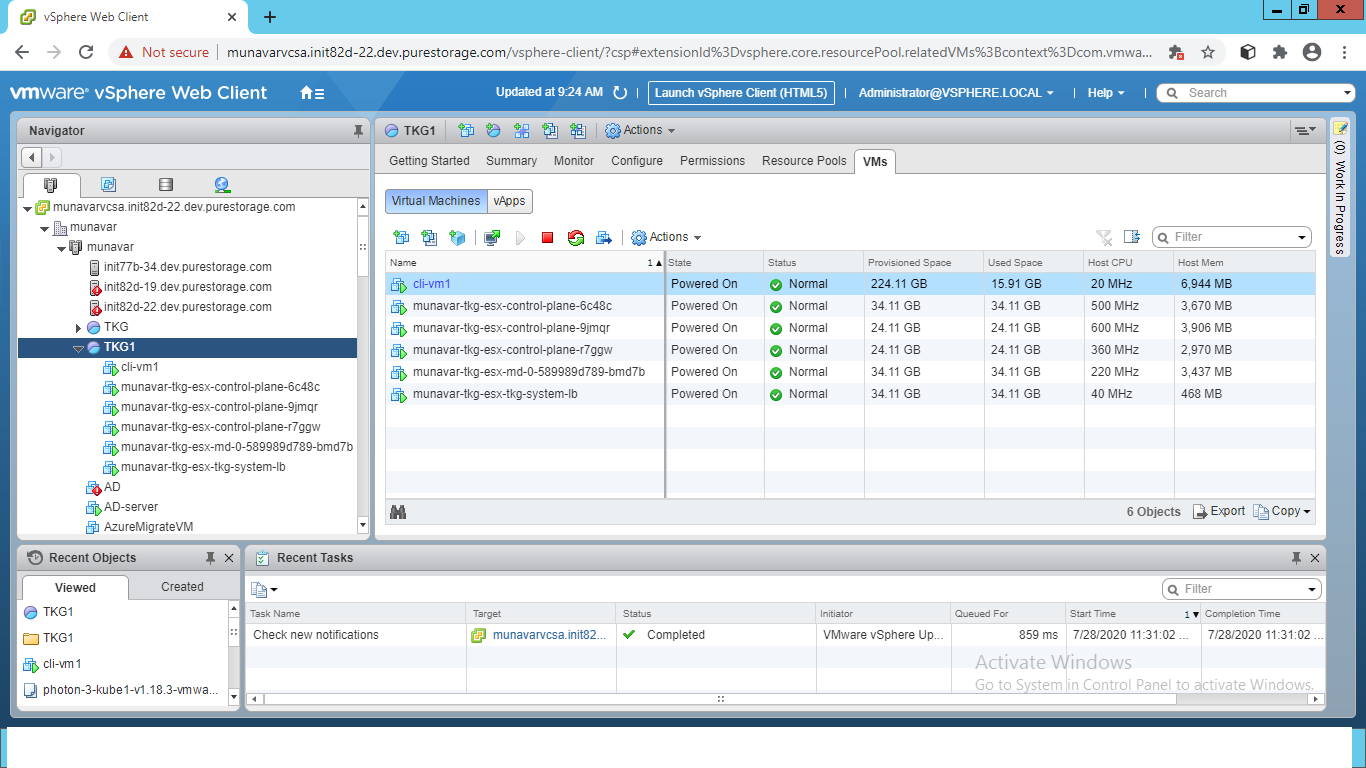
STEP 6: Management cluster is done!
You will start to see the VMs appear on resource pool:
STEP 7: You can verify that all nodes are up & running by running the command
[root@localhost .tkg]# kubectl get nodes NAME STATUS ROLES AGE VERSION munavar-tkg-esx-control-plane-6c48c Ready master 119m v1.18.3+vmware.1 munavar-tkg-esx-control-plane-9jmqr Ready master 121m v1.18.3+vmware.1 munavar-tkg-esx-control-plane-r7ggw Ready master 117m v1.18.3+vmware.1 munavar-tkg-esx-md-0-589989d789-bmd7b Ready119m v1.18.3+vmware.1 [root@localhost ~]# kubectl get nodes -o wide NAME STATUS ROLES AGE VERSION INTERNAL-IP EXTERNAL-IP OS-IMAGE KERNEL-VERSION CONTAINER-RUNTIME munavar-tkg-esx-control-plane-6c48c Ready master 22h v1.18.3+vmware.1 10.20.186.48 10.20.186.48 VMware Photon OS/Linux 4.19.126-1.ph3 containerd://1.3.4 munavar-tkg-esx-control-plane-9jmqr Ready master 22h v1.18.3+vmware.1 10.20.186.47 10.20.186.47 VMware Photon OS/Linux 4.19.126-1.ph3 containerd://1.3.4 munavar-tkg-esx-control-plane-r7ggw Ready master 22h v1.18.3+vmware.1 10.20.186.50 10.20.186.50 VMware Photon OS/Linux 4.19.126-1.ph3 containerd://1.3.4 munavar-tkg-esx-md-0-589989d789-bmd7b Ready 22h v1.18.3+vmware.1 10.20.186.49 10.20.186.49 VMware Photon OS/Linux 4.19.126-1.ph3 containerd://1.3.4
STEP 8: Deploy Tanzu Kubernetes Grid Workload cluster
[root@localhost ~]# tkg create cluster munavar --plan=prod
Logs of the command execution can also be found at: /tmp/tkg-20200729T100156091996395.log
Validating configuration...
Creating workload cluster 'munavar'...
Waiting for cluster to be initialized...
Waiting for cluster nodes to be available...
Workload cluster 'munavar' created

[root@localhost ~]# tkg get clusters
 NAME     NAMESPACE  STATUS   CONTROLPLANE  WORKERS  KUBERNETES
 munavar  default    running  3/3           3/3      v1.18.3+vmware.1

[root@localhost ~]# tkg get credentials munavar
Credentials of workload cluster 'munavar' have been saved
You can now access the cluster by running 'kubectl config use-context munavar-admin@munavar'

[root@localhost ~]# kubectl config get-contexts
CURRENT   NAME                                    CLUSTER           AUTHINFO
          munavar-admin@munavar                   munavar           munavar-admin
*         munavar-tkg-esx-admin@munavar-tkg-esx   munavar-tkg-esx   munavar-tkg-esx-admin

[root@localhost ~]# kubectl config use-context munavar-admin@munavar
Switched to context "munavar-admin@munavar".

[root@localhost ~]# kubectl get nodes -o wide
NAME                            STATUS   ROLES    AGE   VERSION            INTERNAL-IP    EXTERNAL-IP    OS-IMAGE                 KERNEL-VERSION   CONTAINER-RUNTIME
munavar-control-plane-crrzm     Ready    master   42m   v1.18.3+vmware.1   10.20.186.55   10.20.186.55   VMware Photon OS/Linux   4.19.126-1.ph3   containerd://1.3.4
munavar-control-plane-ns49q     Ready    master   43m   v1.18.3+vmware.1   10.20.186.52   10.20.186.52   VMware Photon OS/Linux   4.19.126-1.ph3   containerd://1.3.4
munavar-control-plane-vkcpb     Ready    master   39m   v1.18.3+vmware.1   10.20.186.57   10.20.186.57   VMware Photon OS/Linux   4.19.126-1.ph3   containerd://1.3.4
munavar-md-0-7f5b7745dc-4n296   Ready       42m   v1.18.3+vmware.1   10.20.186.56   10.20.186.56   VMware Photon OS/Linux   4.19.126-1.ph3   containerd://1.3.4
munavar-md-0-7f5b7745dc-9jbqz   Ready       42m   v1.18.3+vmware.1   10.20.186.53   10.20.186.53   VMware Photon OS/Linux   4.19.126-1.ph3   containerd://1.3.4
munavar-md-0-7f5b7745dc-r5rvz   Ready       42m   v1.18.3+vmware.1   10.20.186.54   10.20.186.54   VMware Photon OS/Linux   4.19.126-1.ph3   containerd://1.3.4
You will start to see the VMs appear on resource pool:
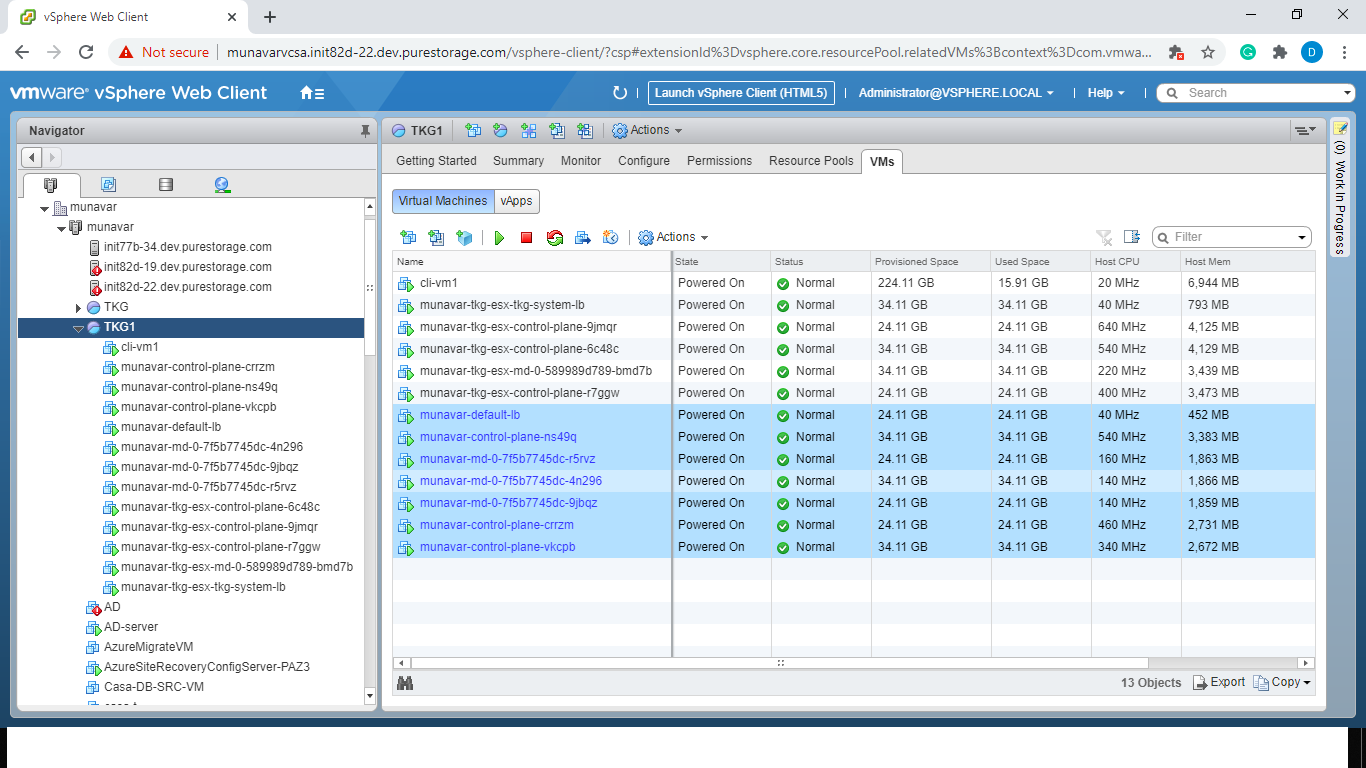
And voila!
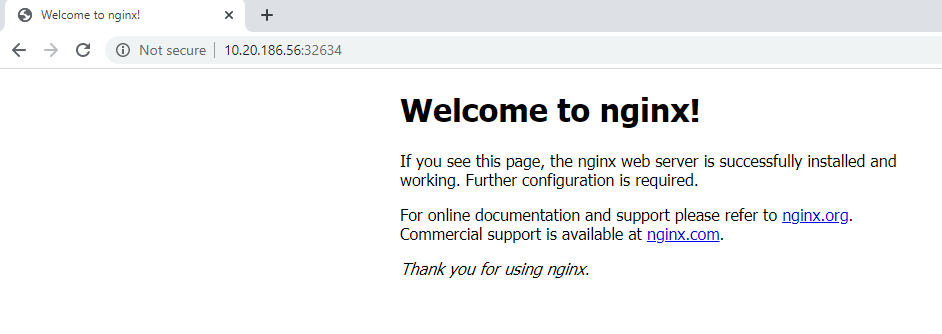
STEP 9: Let us deploy an Nginx application on the TKG cluster:
[root@localhost ~]# kubectl create deployment nginx --image=nginx deployment.apps/nginx created [root@localhost ~]# kubectl create service nodeport nginx --tcp=80:80 service/nginx created [root@localhost ~]# kubectl get svc NAME TYPE CLUSTER-IP EXTERNAL-IP PORT(S) AGE kubernetes ClusterIP 100.64.0.1443/TCP 4h7m nginx NodePort 100.71.36.242 80:32634/TCP 8s [root@localhost ~]# curl munavar-md-0-7f5b7745dc-4n296:32634 <!DOCTYPE html> <html> <head> <title>Welcome to nginx!</title> <style> body { width: 35em; margin: 0 auto; font-family: Tahoma, Verdana, Arial, sans-serif; } </style> </head> <body> <h1>Welcome to nginx!</h1> <p>If you see this page, the nginx web server is successfully installed and working. Further configuration is required.</p> <p>For online documentation and support please refer to <a href="http://nginx.org/" style="color:#00aeff;">nginx.org</a>.<br/> Commercial support is available at <a href="http://nginx.com/" style="color:#00aeff;">nginx.com</a>.</p> <p><em>Thank you for using nginx.</em></p> </body> </html>
References:
- https://www.codyhosterman.com/2020/07/deploying-vmware-tanzu-kubernetes-grid-with-pure-storage-vvols-part-i-deploy-tkg-on-vsphere/
- https://davidstamen.com/deploying-tkg-on-vsphere/
Challenges faced while deploying TKG:
- 1. Initially, I deployed TKG on vSphere 6.7 U1 but the configuration failed while trying to deploy TKG management cluster, with an error “Minimum supported version for TKG deployment as vSphere 6.7 U3”
- 2. On the config.yaml, we have specific parameters SERVICE_CIDR, CLUSTER_CIDR, make sure to go with the defaults (100.64.0.0/13, 100.96.0.0/11) unless they are unavailable for whatever reasons.
- 3. Please ensure the formatting of things in the config.yaml are correctly aligned.
If you follow these steps, you will find it easy to deploy Tanzu Kubernetes Grid Cluster on VMware vSphere infrastructure. If you’d like to know more about TKG, feel free to drop a note in the comments.