Make Your Docker Setup a Success with these 4 Key Components

Audio : Listen to This Blog.
Building a web application to deploy on an infrastructure, which needs to be on HA mode, while being consistent across all zones is a key challenge. Thanks to the efforts of enthusiasts and technologists, we now have the answer to this challenge in the form of Docker Swarm. A Docker Container architecture will allow the deployment of web applications on the required infrastructure.
As a part of this write-up, I will run you through Docker Setup while emphasizing on the challenges and key concern on deploying the web applications on such infrastructure; such that it is highly available, load balanced and deployable quickly, every time changes or releases take place. This may not sound easy, but we gave it a shot, and we were not disappointed.
Background:
The Docker family is hardly restrained by environments. When we started analyzing all container and cluster technologies, the main consideration was easy to use and simple to implement. With the latest version of Docker swarm, that became possible. Though swarm seemed to lack potential in the initial phase, it matured over time and dispels any doubts that may have been expressed in the past.
Docker swarm:
Docker swarm is a great cluster technology from Docker. Unlike its competitors like Kubernetes, Mesos and CoreOS Fleet, Swarm is relatively easier to work with. Swarm holds the clusters of all similar functions and communicates between them.
So after much POC and analysis, we decided to go ahead with Docker, we got our web application up and running, and introduced it to the Docker family. We realized that the web application might take some time to adjust in the container deployment so we considered revisiting the design and testing the compatibility; but thanks to dev community, the required precautions were already taken care of while development.
The web application is a typical 3-tier application – client, server, and database.
Key Challenges of Web Application Deployment
- Slow deployment
- HA
- oad balancer
Now let’s Docker-
Implementation Steps:
- Create a package using Continuous Integration.
- Once the web application is built and packaged, modify the Docker file and append the latest version of the web app built using Jenkins. This was automated E2E.
- Create the image using Docker file and deploy it to container. Start the container and verify whether the application is up and running.
- The UI cluster exclusively held the UI container, and the DB cluster was holding all DB containers. Docker swarm made the clustering very easy and communication between each container occurred without any hurdle.
Docker Setup:
Components:
Docker containers, Docker swarm, UCP, load balancer (nginx)
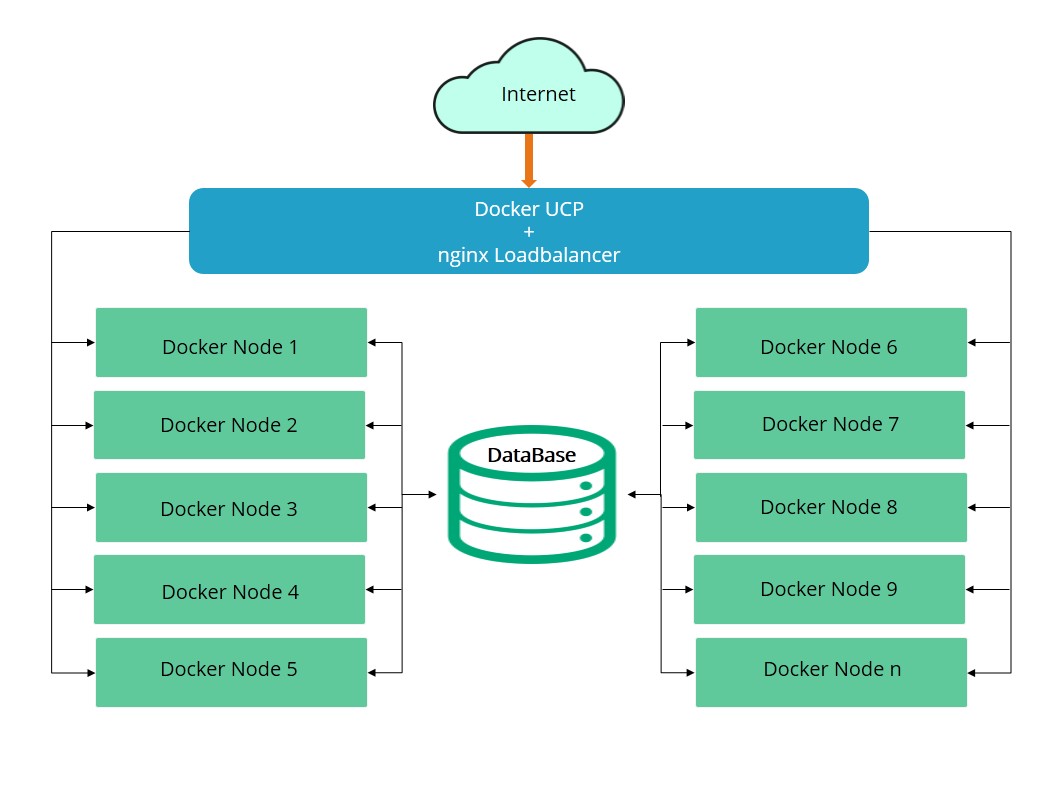
In total there are 10 containers deployed which communicate with DB nodes and fetch the data as per requirement. The containers we deployed were slightly short of 50 for this setup. Docker UCP is an amazing UI for managing E2E containers orchestration. UCP is not only responsible for on-premise container management, but also a solution for VPC (virtual private cloud). It manages all containers regardless of infrastructure and application running on any instance.
UCP comes in two flavors: open source as well as enterprise solution.
Port mappings:
The application is configured to listen in on port 8080, which gets redirected from the load balancer. The URL remains same and common, but eventually, it gets mapped to the available container at that time and the UI is visible to the end user.
Key Docker Setup concerns:
- One concern we faced with swarm is that the existing containers cannot be registered to newly created Docker swarm setup.
- We had to create the Docker swarm setup first and create the images / containers in the respective cluster.
- UI nodes will be deployed in UI cluster and DB nodes are deployed in DB cluster.
- Docker UCP and nginx load balancer are deployed on single host which are exposed to the external network.
- mysqlDB is deployed on DB cluster.
Following is the high level workflow and design:

