How to setup a bootloader for an embedded linux machine

Audio : Listen to This Blog.
This is a three part series of blogs which explains the complete procedure to cross compile
- Bootloader
- Kernel/O.S
- File system
This will be done for ARM processor based development platform.
In short, this blog series explains how to setup an embedded linux machine that suits your needs
Development environment prerequisites
- Linux machine running any flavour of ubuntu, fedora or arch linux.
- Internet connection.
Hardware needed
1.ARM based development board.
a.This is very important as the build process and the cross compiler we choose depends on the type of processor. For this blog series we are using beaglebone black development which is based on ARMv7 architecture.
2.4/8 GB Micro SD Card.
3.USB to Serial adaptor.
Topics discussed in this document
- What is Bootloader?
- Das U-Boot — the Universal Boot Loader
- Stages in boot loading
- Downloading the source
- Brief about the directories and the functionality it provides
- Cross compiling bootloader for ARM based target platform
- Setup the environment variables
- Start the build
- Micro SD card Booting procedure in beaglebone black
What is Bootloader?
There are so many answers to this question, but if you look at the core of all the answers it would contain some kind of initialization. In short this is the piece of software which is executed as soon as you turn on your hardware device. The hardware device can be anything, from your mobile phones, routers, microwave ovens, smart tv, and to the world’s fastest supercomputer. After all, everything has a beginning right?
The reason I said there are so many ways to answer this question, is because the use case of each device is different, and we need to choose the bootloader carefully, which initializes the device. So much research and decision making time is spent on this to make sure that the devices which are initialized are absolutely needed. Everyone likes their devices to boot up fast.
In embedded systems the bootloader is a special piece of software whose main purpose is to load the kernel and hand over the control to it. To achieve this, it needs to initialize the required peripherals which helps the device to carry out its intended functionality. In other words, it initializes the absolutely needed peripherals alone and hands over the control to the O.S aka kernel.
Das U-Boot — the Universal Boot Loader
U-Boot is the most popular boot loader in linux based embedded devices. It is released as open source under the GNU GPLv2 license. It supports a wide range of microprocessors like MIPS, ARM, PPC, Blackfin, AVR32 and x86. It even supports FPGA based nios platforms. If your hardware design is based out of any of these processors and if you are looking for a bootloader the best bet is to try U-Boot first. It also supports different methods of booting which is pretty much needed on fallback situations.
For example, it has support to boot from USB, SD Card, NOR and NAND flash (non volatile memory). It also has the support to boot linux kernel from the network using TFTP. The list of filesystems supported by U-Boot is huge. So you are covered in all aspects that is needed from a bootloader and more so.
Last but not least, it has a command line interface which gives you a very easy access to it and try many different things before finalizing your design. You configure U-Boot for various boot methods like MMC, USB, NFS or NAND based and it allows you to test the physical RAM of any issues.
Now its upto the designer to pick what device he wants and then use U-Boot to his advantage.
Stages in boot loading
For starters, U-Boot is both a first stage and second stage bootloader. When U-Boot is compiled we get two images, first stage (MLO) and second stage (u-boot.img) images. It is loaded by the system’s ROM code (this code resides inside the SoC’s and it is already preprogrammed) from a supported boot device. The ROM code checks for the various bootable devices that is available. And starts execution from the device which is capable of booting. This can be controlled through jumpers, though some resistor based methods also exists. Since each platform is different and it is advised to look into the platforms datasheet for more details.
Stage 1 bootloader is sometimes called a small SPL (Secondary Program Loader). SPL would do initial hardware configuration and load the rest of U-Boot i.e. second stage loader. Regardless of whether the SPL is used, U-Boot performs both first-stage and second-stage booting.
In first stage, U-Boot initializes the memory controller and SDRAM. This is needed as rest of the execution of the code depends on this. Depending upon the list of devices supported by the platform it initializes the rest. For example, if your platform has the capability to boot through USB and there is no support for network connectivity, then U-Boot can be programmed to do exactly the same.
If you are planning to use linux kernel, then setting up of the memory controller is the only mandatory thing expected by linux kernel. If memory controller is not initialized properly then linux kernel won’t be able to boot.
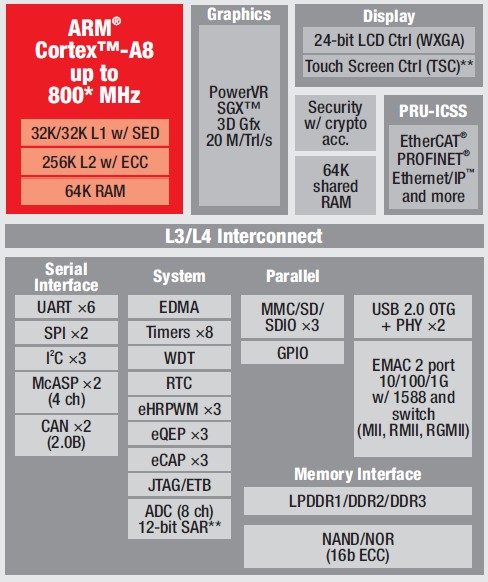
Block Diagram of the target

The above is the block diagram of AM335X SoC.
Downloading the source
U-Boot source code is maintained using git revision control. Using git we can clone the latest source code from the repo.
kasi@kasi-desktop:~/git$ git clone git://git.denx.de/u-boot.git
Brief about the directories and the functionality it provides
arch –> Contains architecture specific code. This is the piece of code which initializes the CPU and board specific peripheral devices.
board → Source in both arch and board directory work in tandem to initialize the memory and other devices.
cmd –> Contains code which adds command line support to carry out different activity depending on the developer’s requirement. For example, command line utilities are provided to erase NAND flash and reprogram it. We will be using similar commands in the next blog.
configs –> Contains the platform level configuration details. This is very much platform specific. The configs are much like a static mapping with reference to the platform’s datasheet.
drivers –> This directory needs a special mention as it has support for a lot of devices:
Each subdirectory under the driver directory corresponds to a particular device type. This structure is followed in accordance with the linux kernel. For example, network drivers are all accumulated inside the net directory:
kasi@kasi-desktop:~/git/u-boot$ ls drivers/net/ -l
total 2448
-rw-rw-r-- 1 kasi kasi 62315 Nov 11 15:05 4xx_enet.c
-rw-rw-r-- 1 kasi kasi 6026 Nov 11 15:05 8390.h
This makes sure the code is not bloated and it is much easier for us to navigate and make the needed changes.
fs –> Contains the code which adds support for filesystems. As mentioned earlier, U-Boot has a rich filesystem support. It supports both read only file system like cramfs and also journalling file system like jffs2 which is used on NAND flash based devices.
include –> This is a very important directory in U-Boot. It not only contains the header files but also the files which define platform specific information like supported baud rates, starting RAM address, stack size, default command line arguments etc.
lib –> Contains support for library files. They provide the needed helper functions used by U-Boot.
net –> Contains support for networking protocols like ARP, TFTP, Ping, Bootp and etc.
scripts and tools –> Contains helper scripts to create images and binaries. It contains scripts to create a patch file (hopefully with some useful fixes) in the correct format if we are planning to send it the development community.
With the source code available and some understanding about the directory structure let us do what we actually want to do i.e. create a bootloader
Since the target board which we are using is based on ARM processor we will need a cross compiler which helps us to create binaries to run on that processor. There are a lot of options for this. Linaro provides the latest cross tool for ARM based processors and it is very easy to get. For this reason, we have chosen to go for the cross tool provided by linaro.
Cross compiling bootloader for ARM based target platform
For cross compiling we can need to download the toolchain from the linaro website using the below link:
kasi@kasi-desktop:~/git$ wget
https://releases.linaro.org/components/toolchain/binaries/latest/arm-linux-gnueabihf/gcc-linaro-6.1.1-2016.08-x86_64_arm-linux-gnueabihf.tar.xz
The toolchain comes compressed as tar file and we can unzip it using the below command:
kasi@kasi-desktop:~/git$ tar xf gcc-linaro-6.1.1-2016.08-x86_64_arm-linux-gnueabihf.tar.xz
Setup the environment variables
With the pre build tool chain, we need to set up a few environment variables like path of the toolchain before proceeding to compile U-Boot. Below are the shell commands that we need to issue.
export PATH=<YOUR_WORK_DIRECTOY>/gcc-linaro-6.1.1-2016.08-x86_64_arm-linux-gnueabihf/bin:$PATH;
export CROSS_COMPILE=arm-linux-gnueabihf-
export ARCH=arm;
In our work space <YOUR_WORK_DIRECTOY> points to /home/kasi/git/ as this is the workspace which we are using.
The exact command from our machine is:
kasi@kasi-desktop:~/git/u-boot$ export PATH=/home/kasi/git/gcc-linaro-6.1.1-2016.08-x86_64_arm-linux-gnueabihf/bin:$PATH
kasi@kasi-desktop:~/git/u-boot$ export CROSS_COMPILE=arm-linux-gnueabihf-
kasi@kasi-desktop:~/git/u-boot$ export ARCH=arm;
Please double check the above commands so that it suits your workspace.
Config File
With everything setup it’s time to choose the proper config file and start the compilation.
The board which we are using is beagle bone black which is based on TI’s AM3358 SoC.
So we need to look for similar kind of name in include/configs. The file which corresponds to this board is “am335x_evm.h”
So from command line we need to execute the below command:
kasi@kasi-desktop:~/git/u-boot$ make am335x_evm_defconfig
  HOSTCC  scripts/basic/fixdep
  HOSTCC  scripts/kconfig/conf.o
  SHIPPED scripts/kconfig/zconf.tab.c
  SHIPPED scripts/kconfig/zconf.lex.c
  SHIPPED scripts/kconfig/zconf.hash.c
  HOSTCC  scripts/kconfig/zconf.tab.o
  HOSTLD  scripts/kconfig/conf
#
# configuration written to .config
#
kasi@kasi-desktop:~/git/u-boot$
There are a lot of things that happened in the background when the above command was executed. We don’t want to go much deeper into that as that could be another blog altogether…!
We have created the config file which is used by U-Boot in the build process. For those who want to know more, please open the “.config” file and check it. Modifications can be done here to the config file directly but we shall discuss about this later.
Start the build
To start the build we need to give the most used/abused command in the embedded linux programmer’s life which is make.
kasi@kasi-desktop:~/git/u-boot$ make
scripts/kconfig/conf  --silentoldconfig Kconfig
  CHK  include/config.h
  UPD  include/config.h
  CC   examples/standalone/hello_world.o
  LD   examples/standalone/hello_world
  OBJCOPY examples/standalone/hello_world.srec
  OBJCOPY examples/standalone/hello_world.bin
  LDS  u-boot.lds
  LD  u-boot
  OBJCOPY u-boot-nodtb.bin
./scripts/dtc-version.sh: line 17: dtc: command not found
./scripts/dtc-version.sh: line 18: dtc: command not found
*** Your dtc is too old, please upgrade to dtc 1.4 or newer
Makefile:1383: recipe for target 'checkdtc' failed
make: *** [checkdtc] Error 1
kasi@kasi-desktop:~/git/u-boot$
If you are compiling U-Boot for the first time, then there are chances that you may get the above error. Since the build machine which we are using didn’t have the device-tree-compiler package installed we got the above error.
Dependency installation (if any)
kasi@kasi-desktop:~/git/u-boot$ sudo apt-cache search dtc
[sudo] password for kasi:
device-tree-compiler - Device Tree Compiler for Flat Device Trees
kasi@kasi-desktop:~/git/u-boot$ sudo apt install device-tree-compiler
Again make
kasi@kasi-desktop:~/git/u-boot$ make
  CHK include/config/uboot.release
  CHK include/generated/version_autogenerated.h
Simple ls -l will show the first stage bootloader and second stage bootloader.
kasi@kasi-desktop:~/git/u-boot$ ls -l
total 9192
drwxrwxr-x   2 kasi kasi   4096 Nov 11 15:05 api
drwxrwxr-x  18 kasi kasi   4096 Nov 11 15:05 arch
drwxrwxr-x 220 kasi kasi   4096 Nov 11 15:05 board
drwxrwxr-x   3 kasi kasi   12288 Nov 14 13:02 cmd
drwxrwxr-x   5 kasi kasi   12288 Nov 14 13:02 common
-rw-rw-r--   1 kasi kasi   2260 Nov 11 15:05 config.mk
drwxrwxr-x   2 kasi kasi   65536 Nov 11 15:05 configs
drwxrwxr-x   2 kasi kasi   4096 Nov 14 13:02 disk
drwxrwxr-x   8 kasi kasi   12288 Nov 11 15:05 doc
drwxrwxr-x  51 kasi kasi   4096 Nov 14 13:02 drivers
drwxrwxr-x   2 kasi kasi   4096 Nov 14 13:03 dts
drwxrwxr-x   4 kasi kasi   4096 Nov 11 15:05 examples
drwxrwxr-x  12 kasi kasi   4096 Nov 14 13:03 fs
drwxrwxr-x  29 kasi kasi   12288 Nov 11 18:48 include
-rw-rw-r--   1 kasi kasi   1863 Nov 11 15:05 Kbuild
-rw-rw-r--   1 kasi kasi   12416 Nov 11 15:05 Kconfig
drwxrwxr-x  12 kasi kasi   4096 Nov 14 13:03 lib
drwxrwxr-x   2 kasi kasi   4096 Nov 11 15:05 Licenses
-rw-rw-r--   1 kasi kasi   11799 Nov 11 15:05 MAINTAINERS
-rw-rw-r--   1 kasi kasi   54040 Nov 11 15:05 Makefile
-rw-rw-r--   1 kasi kasi   79808 Nov 14 13:03 MLO
-rw-rw-r--   1 kasi kasi   79808 Nov 14 13:03 MLO.byteswap
drwxrwxr-x   2 kasi kasi   4096 Nov 14 13:03 net
drwxrwxr-x   6 kasi kasi   4096 Nov 11 15:05 post
-rw-rw-r--   1 kasi kasi  223974 Nov 11 15:05 README
drwxrwxr-x   5 kasi kasi   4096 Nov 11 15:05 scripts
-rw-rw-r--   1 kasi kasi  17 Nov 11 15:05 snapshot.commit
drwxrwxr-x  12 kasi kasi   4096 Nov 14 13:03 spl
-rw-rw-r--   1 kasi kasi   75282 Nov 14 13:03 System.map
drwxrwxr-x  10 kasi kasi   4096 Nov 14 13:03 test
drwxrwxr-x  15 kasi kasi   4096 Nov 14 13:02 tools
-rwxrwxr-x   1 kasi kasi 3989228 Nov 14 13:03 u-boot
-rw-rw-r--   1 kasi kasi  466702 Nov 14 13:03 u-boot.bin
-rw-rw-r--   1 kasi kasi   0 Nov 14 13:03 u-boot.cfg.configs
-rw-rw-r--   1 kasi kasi   36854 Nov 14 13:03 u-boot.dtb
-rw-rw-r--   1 kasi kasi  466702 Nov 14 13:03 u-boot-dtb.bin
-rw-rw-r--   1 kasi kasi  628808 Nov 14 13:03 u-boot-dtb.img
-rw-rw-r--   1 kasi kasi  628808 Nov 14 13:03 u-boot.img
-rw-rw-r--   1 kasi kasi   1676 Nov 14 13:03 u-boot.lds
-rw-rw-r--   1 kasi kasi  629983 Nov 14 13:03 u-boot.map
-rwxrwxr-x   1 kasi kasi  429848 Nov 14 13:03 u-boot-nodtb.bin
-rwxrwxr-x   1 kasi kasi 1289666 Nov 14 13:03 u-boot.srec
-rw-rw-r--   1 kasi kasi  147767 Nov 14 13:03 u-boot.sym
kasi@kasi-desktop:~/git/u-boot$
MLO is the first stage bootloader and u-boot.img is the second stage bootloader.
With the bootloader available it’s time to partition the Micro SD card, load these images and test it on the target.
Partition
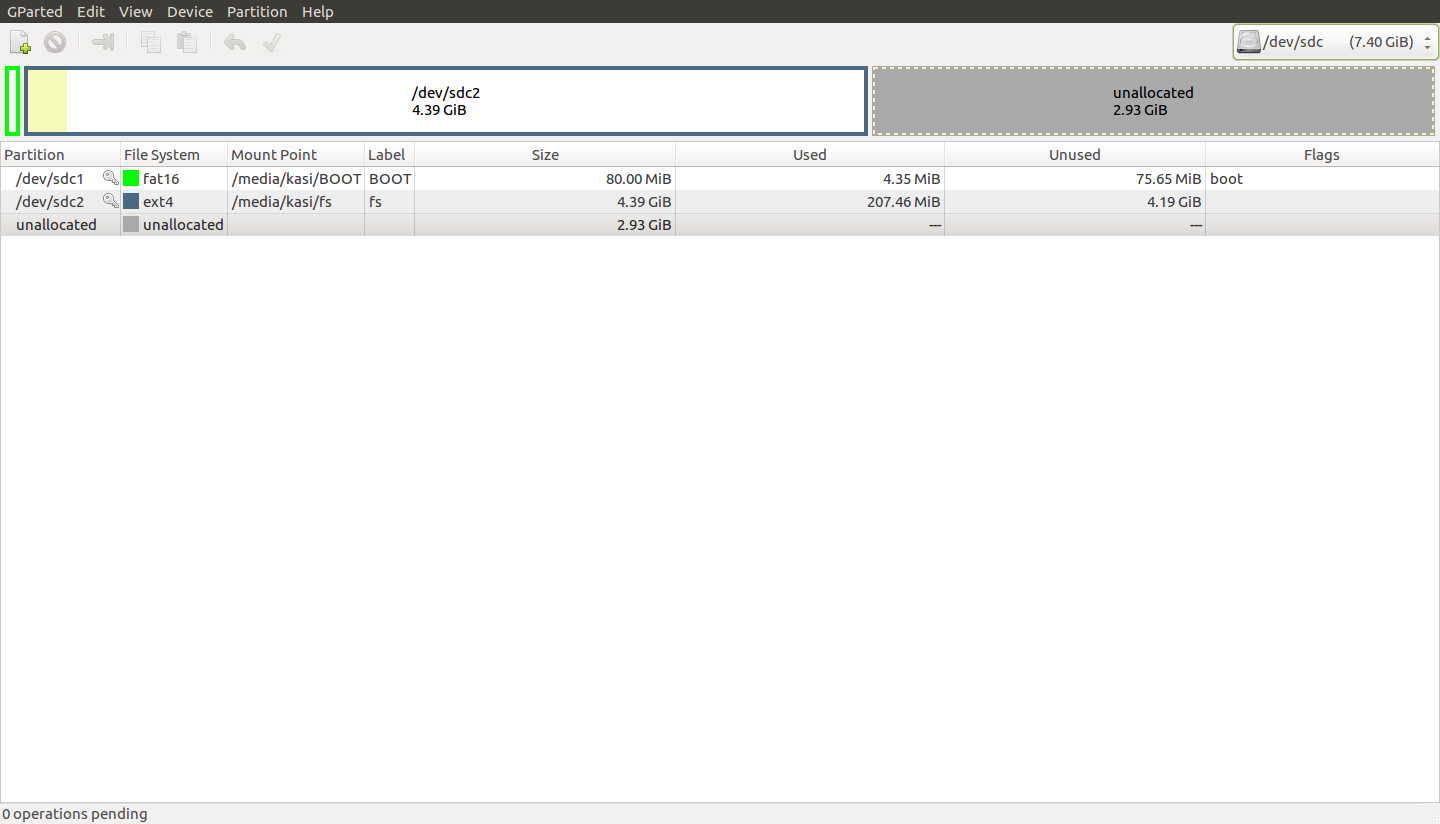
We are using an 8GB Micro SD card and using “gparted” (gui based partition tool) to partition it. It is a much easier approach to use gparted and create the filesystems. We have created two partitions:
1. FAT16 of size 80MB with boot flag enabled.
2. EXT4 of size more than 4GB.
Choosing the size of the partition is an availability as well as a personal choice. One important thing to note here is that the FAT16 partition has the boot flag set. This is needed for us to boot the device using the Micro SD card. Please see the image below to get a clear picture of the partitions in the Micro SD card.

After the creating the partitions in the Micro SD card, remove the card from the build machine and insert it again. In most of the modern distro’s partitions in the Micro SD card get auto mounted which will confirm us that the partitions are created correctly. It will help us to cross verify the created partitions.
Copy the images
Now it’s time to copy the builded images into the Micro SD card. When the Micro SD card is inserted into the build machine it was automatically mounted in /media/kasi/BOOT directory.
kasi@kasi-desktop:~/git/u-boot$ mount
/dev/sdc2 on /media/kasi/fs type ext4 (rw,nosuid,nodev,relatime,data=ordered,uhelper=udisks2)
/dev/sdc1 on /media/kasi/BOOT type vfat (rw,nosuid,nodev,relatime,uid=1000,gid=1000,fmask=0022,dmask=0022,codepage=437,iocharset=iso8859-1,shortname=mixed,showexec,utf8,flush,errors=remount-ro,uhelper=udisks2)
We need to copy just the MLO and u-boot.img file into the BOOT partition of the micro SD card.
kasi@kasi-desktop:~/git/u-boot$ cp MLO /media/kasi/BOOT/
kasi@kasi-desktop:~/git/u-boot$ cp u-boot.img /media/kasi/BOOT/
kasi@kasi-desktop:~/git/u-boot$
With the above commands we have loaded the first stage bootloader as well as the second stage bootloader into the bootable Micro SD card.
Micro SD card Booting procedure in beaglebone black
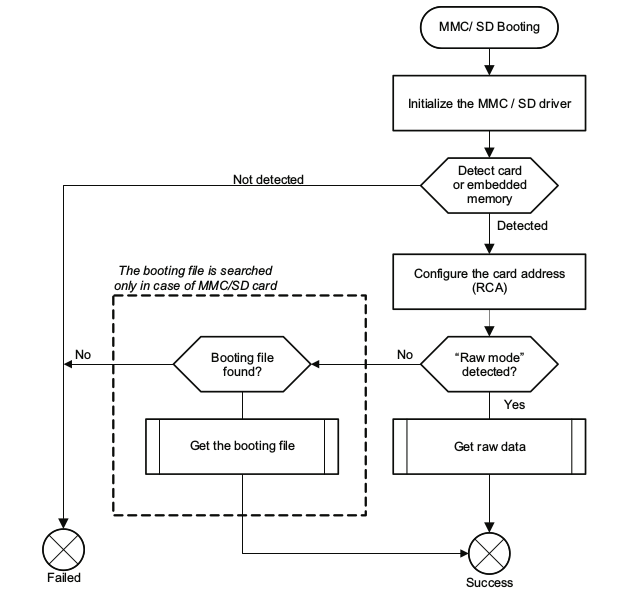
Since the target board has both eMMC and MicroSD card slot, on power up it tries to boot from both the places. To make sure it boots from MicroSD card we need to keep the button near the MicroSD card slot pressed while providing power to the device. This makes sure that the board sees the MicroSD card first and loads the first stage and second stage bootloader which we just copied there.
 Above flowchart shows the booting procedure of the target.
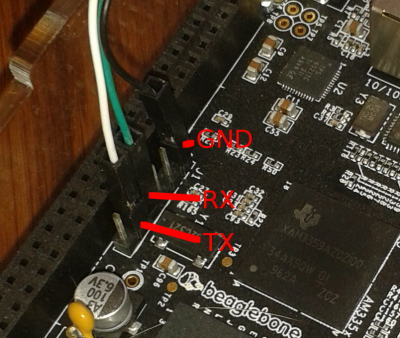
Serial Header

The above diagram shows the close up of the serial port header details of that target. You should connect your pinouts from USB to TTL Serial Cable (if you are using one) to these pins in the target to see the below log.
Below is the output from the serial port while loading U-Boot which was compiled by us.
U-Boot SPL 2016.11-rc3-00044-g38cacda-dirty (Nov 14 2016 - 13:02:35)
############################
##### MSYS Technologies ####
#####   We were here ####
############################
Trying to boot from MMC1
reading uboot.env
** Unable to read "uboot.env" from mmc0:1 **
Using default environment
reading u-boot.img
reading u-boot.img
reading u-boot.img
reading u-boot.img
U-Boot 2016.11-rc3-00044-g38cacda-dirty (Nov 14 2016 - 13:02:35 +0530)
CPU  : AM335X-GP rev 2.0
Model: TI AM335x BeagleBone Black
DRAM:  512 MiB
NAND:  0 MiB
MMC:   OMAP SD/MMC: 0, OMAP SD/MMC: 1
reading uboot.env
** Unable to read "uboot.env" from mmc0:1 **
Using default environment
<ethaddr> not set. Validating first E-fuse MAC
Net:   eth0: ethernet@4a100000
Hit any key to stop autoboot:  0
=>
=>
As you can clearly see this is the U-Boot which we compiled and loaded into the target (Check for string MSYS technologies in the log, second line of the output.
First stage bootloader checks and loads the u-boot.img into RAM and hands over the control to it which is the second stage bootloader. As shared before U-Boot also provides us with a cli which can be used to set up various parameters like IP address, load addresses and a lot more which the developer can use for tweaking and testing purposes.
To the second stage bootloader we need to provide proper kernel image to load and proceed with the next step of bootstrapping. We shall discuss about this in next blog.
